So I have recently been inspired by French/English Victorian Shabby Chic design, colors, and decor, and decided to start to transform my office/design space/ creative room into a French Shabby Chic paradise. This was inspired by many different things, one being that my family is about to move to our first house EVER... YAY! Which means that I will need to redecorate all of the rooms all over again... What a bummer! ;) The french shabby chic inspiration actually came from my recent design of my daughters Barbie blanket, in which I was looking for vintage silhouettes, crochet scallops, and light pink flourishs. i originally thought that I would gear my daughters bedroom towards a "Barbie in Paris" theme, but I now think that I will focus this attention to my office instead. My daughter will still get an awesome room designed, but I think I will take teh French theme for myself. The secong inspiration for my new office design is Michaels, yes, the craft store. Michaels is currently carrying a GORGEOUS french shabby chic line of decor, made by Ashland home decor. So, I purchased a dusty rose wire dress form, a couple of decorative hangers with the eiffel tower and victorian skeleton key designs, and a couple of stacking boxes in teh same basic style. What I am planning is to paint my new office a light dusty rose/ petal pink, with cream trim, and use black accents - such as shelves and knobs - around the room. I also want to invest in some glass apothecary decanters to hold my various nick knacks, and perhaps drape chiffon and pearls around the room in different ways. I also am on the lookout for Victorian mirrors and picture frames; I'd like to have one main picture frame hanging on the wall (I saw the perfect one at the Road to California Quilt show this past weekend), and would like the smaller picture frames for applique work that I would like to design to embellish my walls. The applique work I'd like to incorporate would include various silhouettes of women, a chandalier, bird cages, skeleton keys, the eiffel tower, fleur de lis, and a crown, all of which would be embellished appropriatly, and mounted on a beutifully quilted background in a shabby chic appropriate style. My main goal is to turn my office/design space into a "happy" inspiring place to be. As of right now, all of my inspirational pictures are just copied and pasted to a Word document, but as soon as I have something concrete to show, I'll take a picture and get it uploaded in here ASAP!
My word of advice to everyone out there.... Let the world inspire you! There are so many things worth being inspired by, wether it be an old vintage mirror, or a beautiful combination of colors, or a picture of a bird. Once you get inspired, don't get in your way; let the creativity flow with every inspiration/ thought that comes to mind. This is how great things happen!
Friday, January 28, 2011
Tuesday, January 4, 2011
A couple of weeks ago I receive a box from Hancock Fabrics which, in addition to my 5 yds of Peltex#70 (to be used on another project), contained various 1 yd cuts of cute "Barbie" or Barbie looking fabric. Upon receiving the box, I noticed that one particular cut of fabric was exceptionally soft, and it fueled my creative interest for my latest design. To add to the creativity that was already begining to form, my daughter walked into the room and gasped saying, "Mom! It's Barbie! Oh, I love it so much!" I immediately went into my craft room (which is a disaster right now :( ), and began pulling out all of the various left over cuts of soft fabrics that I've been storing over the past year. What I came away with was a wide assortment of minky's, flannels, and satins, all in a Barbie approved color scheme.


Now, I had originally planned to continue to follow the "Bloomin' Trellis" pattern, and add gathered ruffles along the sewn 'ditches', creating a lattice look, however I'm not so sure I'm going to go that route anymore. I feel as though the gathers would be too much, however, if I don't do the gathers, my uneven/ not-lined-up edges and corners will show. Hmmm... I might have to think on that one a little longer. Anywho, it's still in the works, so no need to decide on that just yet!
After sewing all of my 5" squares together, I decided to add a 12" border of white minky dot around the edges. This would allow for me to get creative with various applique's, as well as allow for a 1 1/2" satin border.
Then I began to think, "What am I going to applique onto the blanket?" Originally I had planned to use the design included in the "Bloomin' Trellis" pattern, but since this is a "Barbie" blanket, I decided to do some online searching for Barbie related designs.
My goal for this blanket was for it to look cute and girly, yet sophisticated and shabby chic. I immediately envisioned a Barbire cameo silhouette in each corner, complete with a ruffled/scalloped frame around each. I looked online and found a darling "vintage" Barbie silhouette, and cropped it to an approximate 3.5x5" size. For the cameo frame, I crocheted a scalloped edging using thin cotton yarn and a 3.5mm hook. To finish the look off, I gave Barbie a pink satin bow for her hair, and a pearl necklace. The result...


Then all I needed was a top and bottom applique design to finish everything off. For the top, I went with a girly heart swirl flourish, cut out of a light pink rose embossed minky; and for the bottom I chose the classic Barbie logo, cut out of hot pink satin.


Here's a wide shot of the whole top piece, and my daughter, who is absolutely in LOVE with her un-finished blankie...


SO, it's not completely finished, but almost. As soon as Joann's put's their minky on sale from $15/yd to under $9/yd, I'll be down there buying the backing, batting, and light pink satin binding to finish this blanket off. As of now, I'm thinking of quilting it using the stitch in the ditch method for the center, and then carrying that through the edges of the blanket, creating a 4 1/2" diamond grid over the whole thing. I think I might do this using a pink thread, so that the quilted diamond grid stands out against the white. I don't know... just an idea, it might change tomorrow!
Monday, December 27, 2010
Merry Christmas and Happy Holidays!
Can you believe that Christmas has already come and passed us by? This is the time of year I usually get a bit sad... you see, we have all this anicipation for an entire month over Santa and the count-down to Christmas day, and within 24 hours it's all over. I'm getting ready to tear everything down, and finally get my home cleaned up, but I feel as if a small part of me will break when I do it. Then again, we are approaching a new and exciting year here in a couple of days, and that brings a smile to my face. My daughter will be turning 3 on January 10th! I can't even believe it. My daughter is turning 3! Where has time gone? This time of year is just very humbling to me, and always seems to put things into perspective.
Anywho... I want to appologize for not posting on here for quite some time. Sometime around September of this year, my hard drive crashed on my computer, and it took up to a couple of weeks ago to finally get it fixed and up and running. NOW, I plan to get on here at least twice a month, hopefully once a week.
On the craetive side of things, I've got many new and exciting things planned for this year! I just got a cricut machine for Christmas, so I am thinking about re-opening and re-vamping my cards and invitation store on etsy, as well as expanding my crochet store to include knit and possibly quilted items as well. If I do that, however, I'll have to think up a new slogan for my store. Hmmm.... what to do.... what to do?
Another exciting opportunity that might be possible is Amanda Fish's - of "The Quilted Fish" - new design team that she is putting together. Basically, Amanda is compiling a team of 5-10 creative minds across the country and giving them projects, goals, and tasks to design, complete, and blog about, in order to promote her line of products.... at least that what I think it's for!? Either way, it will be a blast, and it would allow for me to design and create - something I absolutely LOVE to do - colaborate with other designers, and share my experiences with others. How amazing would that be? I just submitted my application to her a couple of days ago, so now I am just anxiously awaiting her decision. But just as a heads up, IF I were to make this awesome team, this blog will be getting ALOT of attention, and will be broadened to include many different crafts, ideas, tutorials, etc. Lets all cross our fingers that it works out!
Well... I have a little rug rat calling my name right now, so I'll finish this post for now. I hope to be back with another post and update within the next week.
Happy Holidays!
Alicia
Tuesday, September 14, 2010
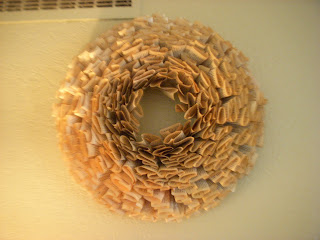
I now give to you my latest creation.... The Book Wreath!!

It's amazing, I must say. I originally saw this wreath on the Quilted Fish blog spot, which then linked me to another site with directions on how to make this beatuty myself. While a book did need to be destroyed, it lended itself to a beautiful piece of art that hangs nicely above my bookshelf, and bring character to my living room.
This took me a few hours to create, especially since I went with a 12" foam ring rather than the suggested 10", but the outcome is well worth it!
Want to know how to make it yourself?? Find it here on this link: http://livingwithlindsay.com/2009/11/librarians-please-avert-your-eyes.html
I also went to my local thrift store and bought a stack of old books ($.25 ea.) and used them in place of a new(er) book. This ended up being even better due to the fact that there is already the yellowing/browning of the edges which enhances it's rustic antiquity. If you go this route you could skip the painting of the edges all together, although I did apply some stain to the edges as well. All in all, this is a great project that doesn't break the bank (unless you buy supplies from Michaels like I did... not too smart!), and can be completed in a few hours. Want something to do for a craft party, or need an idea for a unique gift? Make this!
More pictures of my finished product!


Thursday, September 2, 2010
Kaylie's Closet Patterns!
After many requests for me to create patterns for my "Wildlife" hats, I have finally decided to sit down and make it happen. Let me start off my saying that I HATE writing patterns; which is apparent in teh fact that I have been dodging this task for a couple of years now. The decision was made when, the other day, I received an order for my "King of the Jungle" beanie. While sitting down making this beanie the other night, I got confused as to whether the mjic circle for a 2T was supposed to be 60 or 66 sc, so through trial and error (which wasted 2 hours of my life!) I realized that it was supposed to be 60... not 66. SO I decided, "Hey, it would be much easier if I just wrote this down!" So I did. I also get confused as to which size crochet hook I was using, so I wrote that down too. Well, once I got started on the size of the hook, and how many sitches needed to be done to create my hat, I realized that I was half way to having a pettern drafted. A couple of pictures later, and a little bit of detail to the directions, and my pattern is almost complete. Now all I need to do is create a pattern for other sizes... which is a problem. I think for now I will just draft up all of my patterns for my most popular 2T+, and then add other sizes later as I go. The bottom line is that I am finally getting somewhere with solidifying my ideas into patterns. I now get to chalk 1 big point up on my "good job" list for the day! Yay!
Keep tuned to see when I finally have the patterns ready for sale, as well as complete kits to turn the patterns into an amazing product! More patterns are soon to follow.
*** All of my items, including future patterns can be found at www.kayliescloset.etsy.com
Keep tuned to see when I finally have the patterns ready for sale, as well as complete kits to turn the patterns into an amazing product! More patterns are soon to follow.
*** All of my items, including future patterns can be found at www.kayliescloset.etsy.com
Wednesday, September 1, 2010
Quilted Fish Giveaway!!!
This year I began a new hobby (I know... as if I REALLY need another one!) - quilting! After years of protest that quilting was an "old lady" thing to do, I finally got sucked into it, first by the excuse of recreating my daughters favorite blankie, and now simply because it is awesome! I must confess, I have become absolutely obsessed with fabric, and drool incessantly over the lastest patterns and crafty ideas. There is one thing that sets be apart from the "old lady" quilters, howver, (other than just my age) and that is my fresh new ideas and creativity. I hate plain quilts! If I am going to put endless hours into a blanket, it is going to be "hooked up." My first quilt ever was a mini mouse blanket for my daughter, complete with a hand appliqued mini mouse head with a 3D bow, tiny pink bows at all the block corners, and flower buttons on the back. I like to do everything to the max, make evrything uuber girly, fun, and trendy, and treat every blanket like a "Close to My Heart" scrapbook!
Anyway, what promted me to write this blog in the first place is that one of my favorite quilters that I have ever come across - Amanda Herring, thequiltedfish.com - is having an amazing giveaway right now for some of her patterns, including amazing fabric to bring them to life. How great is that? Not only do I suggest to everyone to go check out her website for the giveaway, but I highly reccomend Amandas work and creativity to anyone who is looking for fun, unique, creative, and sassy quilting creations for the younger generation. I absolutely fell in love with Amanda and her work at the Long BEach quilt show earlier this summer, and she truely is an inspiration to me and a creative artist! I will never forget her and her work... she is truely an amazing woman!
Anyway, what promted me to write this blog in the first place is that one of my favorite quilters that I have ever come across - Amanda Herring, thequiltedfish.com - is having an amazing giveaway right now for some of her patterns, including amazing fabric to bring them to life. How great is that? Not only do I suggest to everyone to go check out her website for the giveaway, but I highly reccomend Amandas work and creativity to anyone who is looking for fun, unique, creative, and sassy quilting creations for the younger generation. I absolutely fell in love with Amanda and her work at the Long BEach quilt show earlier this summer, and she truely is an inspiration to me and a creative artist! I will never forget her and her work... she is truely an amazing woman!
Friday, August 6, 2010
"King of the Jungle" becomes a finalist!
I am pleased to announce that I have just been informed (as of 8/6/10) that my "King of the Jungle hat has made into into the final round of Lion Brands Yarn Imagination Contest. My hat will be judged alongside 14 other entries in determining the best yarn invention of the year! I am SO excited!!! Out of all the entries submitted, my king of the jungle hat was picked as one of 15 creations to complete in the final rounds. Grand prize... a trip for two to New York, where you get a tour of the Lion Brand Yarn Company (which is amazing!) and $1,000 spending money... sounds pretty good to me! There are also 2 second place winners which get $500 to Hancock Fabric, 2 third place winners who get $100 to Hancock, and the remaining 10 finalists get $50 to Hancock. So, worst case scenario, I get $50. Not bad... not bad at all!
Anyway, its been a long time since I have blogged on here, so I plan to do a thorough update in the next couple of weeks. I am in the process of creating a few new additions to my "Wild Life Collection" of hats, so I will get those pictures posted as soon as they become available.
As always, have a wonderfully, amazing, creative, imagination filled day!
Subscribe to:
Posts (Atom)